
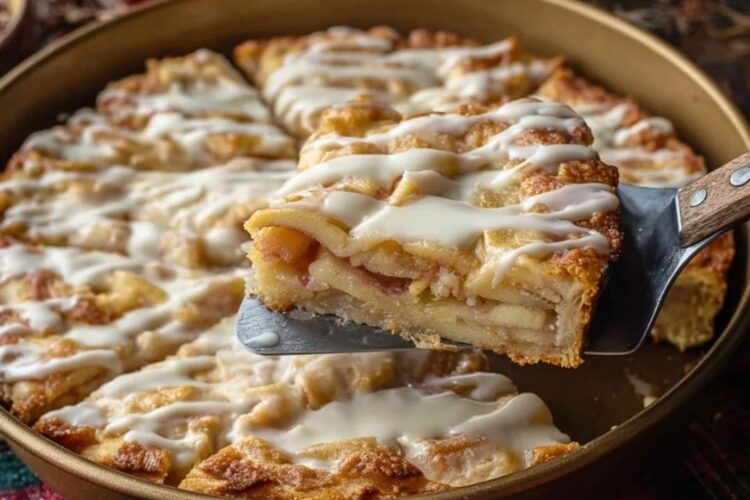
Apple Pie Bars give you all the cozy flavors of a homemade apple pie in an easier, shareable form. They start with a buttery shortbread crust, layered with tender cinnamon apples and finished with a golden crumble topping. Perfect for dessert, brunch, or even breakfast with coffee.
This recipe came from my love of apple pie but not the patience to make one from scratch on a weeknight. I wanted all that warm, spiced apple flavor with a buttery crust and crumbly topping — but in a simple, handheld bar form. The first time I made these, my kitchen smelled like fall, and they disappeared faster than any pie I’ve ever baked.
Cuisine: American Dessert
Prep Time: 20 minutes
Cook Time: 40 minutes
Total Time: 1 hour
Servings: 12 bars
Calories: ~280 per bar
Ingredients
For the Crust and Topping:
- 2 ½ cups all-purpose flour
- ¾ cup granulated sugar
- ½ tsp salt
- 1 cup (2 sticks) unsalted butter, cold and cubed
- 1 tsp vanilla extract
For the Apple Filling:
- 4 cups peeled, diced apples (Granny Smith or Honeycrisp)
- 2 tbsp lemon juice
- ½ cup brown sugar
- 2 tbsp all-purpose flour
- 1 tsp cinnamon
- ¼ tsp nutmeg
- Pinch of salt
For Serving (Optional):
- Caramel sauce
- Vanilla ice cream or whipped cream
Instructions
1. Preheat and Prepare
Preheat oven to 350°F (175°C). Line a 9×13-inch baking pan with parchment paper and lightly grease.
2. Make the Crust
In a large bowl, combine flour, sugar, and salt. Cut in the cold butter using a pastry cutter or your hands until crumbly. Stir in vanilla extract.
Press about two-thirds of the mixture into the bottom of the prepared pan to form the crust. Bake for 12–15 minutes, until lightly golden.
3. Make the Apple Filling
In another bowl, toss diced apples with lemon juice, brown sugar, flour, cinnamon, nutmeg, and salt until evenly coated.
4. Assemble
Spread the apple mixture evenly over the baked crust. Sprinkle the remaining crumb mixture on top as the crumble layer.
5. Bake
Return to the oven and bake for 30–35 minutes, until the top is golden and the apples are tender.
6. Cool and Serve
Let cool completely before cutting into bars. Serve as-is, or warm with a scoop of vanilla ice cream and a drizzle of caramel sauce.
Pro Tips
- Use firm apples so they don’t turn mushy. Granny Smith adds nice tartness.
- Chill the bars before cutting for cleaner slices.
- Add a handful of chopped pecans or walnuts to the topping for crunch.
- Warm a slice in the microwave for 10 seconds before serving for that “fresh pie” feel.
Ingredient Substitutions
- Butter: Use plant-based butter for a dairy-free version.
- Apples: Mix varieties for more depth (like Granny Smith + Fuji).
- Brown Sugar: Coconut sugar works as a natural swap.
- Flour: Use gluten-free all-purpose blend for a GF version.
Serving Suggestions
- Serve warm with ice cream or whipped cream.
- Drizzle with caramel or maple syrup.
- Perfect for potlucks, holidays, or cozy weekends at home.
Storage Tips
- Room Temperature: Store covered for up to 2 days.
- Refrigerate: Lasts up to 5 days in an airtight container.
- Freeze: Wrap tightly and freeze for up to 2 months. Reheat in the oven for best texture.
FAQs
Q: What kind of apples are best?
A: Granny Smith for tartness, Honeycrisp for sweetness, or a mix of both.
Q: Can I make this ahead of time?
A: Yes! Bake, cool, and refrigerate. They taste even better the next day.
Q: Can I use canned apple pie filling?
A: You can, but fresh apples give a better texture and flavor.
Q: Can I double the recipe?
A: Absolutely. Just use a larger pan or bake in two 9×13 pans.
Q: How do I make them extra gooey?
A: Add a drizzle of caramel or a spoonful of apple butter over the filling before topping with the crumble.

Apple Pie Bars
Course: DessertCuisine: AmericanDifficulty: Easy12
bars18
minutes40
minutes280
kcalIngredients
- For the Crust and Topping:
2 ½ cups all-purpose flour
¾ cup granulated sugar
½ tsp salt
1 cup (2 sticks) unsalted butter, cold and cubed
1 tsp vanilla extract
- For the Apple Filling:
4 cups peeled, diced apples (Granny Smith or Honeycrisp)
2 tbsp lemon juice
½ cup brown sugar
2 tbsp all-purpose flour
1 tsp cinnamon
¼ tsp nutmeg
Pinch of salt
- For Serving (Optional):
Caramel sauce
Vanilla ice cream or whipped cream
Directions
- 1. Preheat and Prepare
Preheat oven to 350°F (175°C). Line a 9×13-inch baking pan with parchment paper and lightly grease. - 2. Make the Crust
In a large bowl, combine flour, sugar, and salt. Cut in the cold butter using a pastry cutter or your hands until crumbly. Stir in vanilla extract.
Press about two-thirds of the mixture into the bottom of the prepared pan to form the crust. Bake for 12–15 minutes, until lightly golden. - 3. Make the Apple Filling
In another bowl, toss diced apples with lemon juice, brown sugar, flour, cinnamon, nutmeg, and salt until evenly coated. - 4. Assemble
Spread the apple mixture evenly over the baked crust. Sprinkle the remaining crumb mixture on top as the crumble layer. - 5. Bake
Return to the oven and bake for 30–35 minutes, until the top is golden and the apples are tender. - 6. Cool and Serve
Let cool completely before cutting into bars. Serve as-is, or warm with a scoop of vanilla ice cream and a drizzle of caramel sauce.
Recipe Video
Notes
- Pro Tips
Use firm apples so they don’t turn mushy. Granny Smith adds nice tartness.
Chill the bars before cutting for cleaner slices.
Add a handful of chopped pecans or walnuts to the topping for crunch.
Warm a slice in the microwave for 10 seconds before serving for that “fresh pie” feel. - feel.
Ingredient Substitutions
Butter: Use plant-based butter for a dairy-free version.
Apples: Mix varieties for more depth (like Granny Smith + Fuji).
Brown Sugar: Coconut sugar works as a natural swap.
Flour: Use gluten-free all-purpose blend for a GF version.


[…] you’ve ever wanted a dessert that feels both comforting and sophisticated, this pie is […]
[…] you’ve ever wished your favorite chai latte could somehow merge with warm apple pie, this is it. The spiced cream, apple sweetness, and comforting chai flavors come together in a […]