

Remember That Joyful Taste of Cake Batter and Sprinkles?
There’s something magical about Funfetti desserts. Maybe it’s the cheerful pop of rainbow sprinkles or the nostalgic sweetness that brings back childhood memories of licking the spoon while baking with family. Whatever it is, that burst of happiness is exactly what this Easy No-Bake Funfetti Oreo Icebox Cake Recipe delivers — no oven, no stress, and no fancy skills required.
You know those days when you just want something sweet, creamy, and fun without spending hours baking? This dessert is your answer. It’s the perfect combination of smooth cream layers, crunchy Oreos, and colorful Funfetti charm — all chilled to perfection. It’s so easy that even if you’ve never made an icebox cake before, you’ll feel like a dessert pro by the end.
What Exactly Is a No-Bake Funfetti Oreo Icebox Cake?
If you’re new to the idea of an icebox cake, here’s the scoop: it’s a layered dessert that chills instead of bakes. Instead of turning on the oven, you layer cookies and creamy filling, then let time and the refrigerator do the magic. As it chills, the cookies soften, blending with the cream to create a texture somewhere between cake and mousse — soft, cool, and irresistible.
This particular version combines:
- The classic crunch of Golden Oreos
- The sweet vanilla flavor of Funfetti
- And the light, airy cream layers that melt in your mouth
The result? A dessert that’s festive enough for birthdays, easy enough for weeknights, and tasty enough to make you wonder why you ever bothered baking in the first place.
Why You’ll Love This Easy No-Bake Funfetti Oreo Icebox Cake Recipe
You’re about to fall in love with this dessert for more than just its looks. Here’s why:
It’s Quick and Effortless
You don’t need a mixer, oven, or any complicated steps. You’ll be layering and chilling before you know it.
Kid-Friendly and Party-Perfect
The bright sprinkles make it a showstopper at parties — especially birthdays and baby showers. It’s the kind of dessert kids get excited about before they’ve even tasted it.
Make-Ahead Magic
Because it sets in the fridge, you can prepare it a day in advance. That means less stress and more time to actually enjoy your celebration.
Customizable and Fun
You can tweak it endlessly — different pudding flavors, cookie types, or even holiday-themed sprinkles. It’s a creative baker’s dream.
Ingredients You’ll Need for Your Funfetti Oreo Icebox Cake
Here’s everything you’ll need to bring this colorful treat to life.
| Ingredient | Quantity | Notes or Substitutes |
|---|---|---|
| Golden Oreos | 1 package (approx. 36 cookies) | Use Funfetti Oreos for extra flavor |
| Cream cheese | 8 oz (softened) | Adds richness and structure |
| Whipped topping (Cool Whip) | 2 cups | Homemade whipped cream works too |
| Instant vanilla pudding mix | 1 box (3.4 oz) | White chocolate or cheesecake flavor also works |
| Milk | 1 ½ cups | Whole or 2% for creaminess |
| Rainbow sprinkles | ½ cup | Add more for a festive look |
| Vanilla extract | 1 teaspoon | Optional but enhances flavor |
Pro tip: Make sure your cream cheese is fully softened before mixing — it’ll give your filling that dreamy, velvety texture.
How to Make the Easy No-Bake Funfetti Oreo Icebox Cake Recipe
Step 1: Crush the Oreos
Take your Golden Oreos and break them into medium-sized chunks. You don’t want a fine crumb — the little bits give your cake a nice crunch. If you prefer a softer texture, dip each cookie in milk before layering.
Step 2: Prepare the Creamy Filling
In a large mixing bowl, combine softened cream cheese, vanilla pudding mix, milk, and vanilla extract. Beat until the mixture becomes smooth and creamy. You’ll notice it thickens slightly as it rests.
Step 3: Fold in the Whipped Topping
Gently fold the whipped topping into the pudding mixture. Avoid overmixing — the goal is to keep it light and airy. Sprinkle in those colorful Funfetti sprinkles and fold a few more times to evenly distribute them.
Step 4: Layer Your Cake
Grab an 8×8-inch or 9×9-inch dish. Begin with a layer of Oreos on the bottom, followed by a thick layer of your creamy Funfetti filling. Repeat the process until you reach the top, finishing with cream.
Step 5: Chill to Perfection
Cover the dish and refrigerate for at least 4 hours — or overnight for best results. During this time, the Oreos soften, creating that luscious icebox cake texture you’ll love.
Step 6: Decorate and Serve
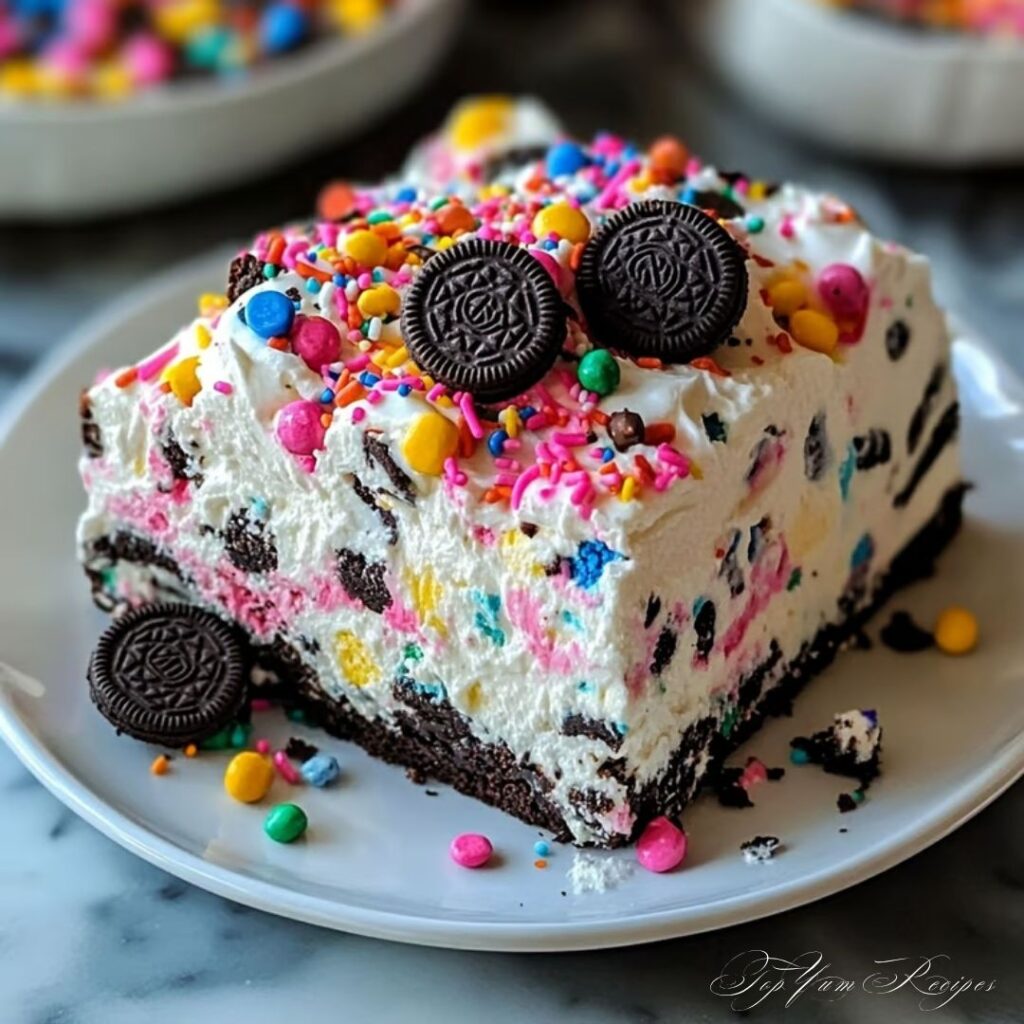
Before serving, top with extra whipped cream, crushed Oreos, and a sprinkle of rainbow happiness. Slice it up and get ready for smiles all around.
Pro Tips for the Perfect Funfetti Oreo Icebox Cake
- Use a clear dish: The colorful layers look stunning through glass.
- Let it chill overnight: The longer it sits, the more the flavors blend.
- Customize the colors: Try themed sprinkles for holidays — red and green for Christmas, pink and white for Valentine’s Day, etc.
- Add texture: Mix in mini marshmallows, crushed candy bars, or white chocolate chips for fun twists.
You’ll find that each slice tastes slightly better the next day — as the cookies soften, the flavor deepens, giving that melt-in-your-mouth feel.
Creative Variations to Try
Don’t be afraid to experiment. Once you’ve made the classic version, you can branch out with these creative ideas:
Chocolate Lovers’ Dream
Use chocolate Oreos instead of Golden ones, swap vanilla pudding for chocolate, and sprinkle mini chocolate chips on top. The result? A decadent chocolate-Funfetti mashup.
Birthday Cake Edition
Add a touch of cake batter extract to your filling for that signature birthday cake flavor. Use bright rainbow sprinkles for the ultimate celebration vibe.
Strawberry Shortcake Twist
Add a layer of crushed freeze-dried strawberries between the cookies and cream layers. It gives a fruity balance that pairs beautifully with the vanilla base.
Lemon Sunshine Version
Substitute the pudding with lemon instant pudding mix and add a little lemon zest for a bright, tangy finish.
Storage and Make-Ahead Tips
Refrigeration
Store your cake tightly covered in the refrigerator for up to 3–4 days. It stays fresh and creamy, and the texture actually improves after the first day.
Freezing
If you want to save a few pieces for later, freeze individual slices in airtight containers. When you’re ready to enjoy, thaw overnight in the fridge. It tastes almost as good as fresh!
Transporting
Heading to a party? Chill the cake overnight, then place it in a cooler with ice packs to keep it firm during travel.
Frequently Asked Questions About the Easy No-Bake Funfetti Oreo Icebox Cake Recipe
Can I make this dessert ahead of time?
Absolutely. In fact, making it a day ahead gives the best flavor and texture since the layers have time to blend.
Can I use homemade whipped cream instead of Cool Whip?
Yes! Just make sure it’s stabilized with a bit of powdered sugar or cornstarch to hold its shape.
What size pan should I use?
An 8×8-inch or 9×9-inch dish works perfectly for this recipe, but you can double it for a larger crowd.
How long should I chill it?
At least 4 hours, though overnight is ideal for that soft, cake-like consistency.
Can I change the cookie flavor?
Of course! Try lemon, chocolate, or birthday cake Oreos for different flavor profiles. Each one gives a new twist on the same creamy foundation.
Troubleshooting: Common Mistakes to Avoid
Even though this recipe is easy, a few small tweaks can make it flawless every time:
- Using cold cream cheese can lead to lumps — make sure it’s fully softened.
- Overmixing the filling can deflate the whipped topping, making it dense.
- Not chilling long enough may result in crunchy cookies instead of that cake-like texture.
- Skipping the layer order can make the dessert fall apart — always start and end with cream.
Follow these small tips and you’ll have a professional-looking icebox cake that tastes as amazing as it looks.
Why This Recipe Works Every Time
The balance of textures and flavors is what makes this Easy No-Bake Funfetti Oreo Icebox Cake Recipe so reliable. The creamy filling complements the crisp cookies, which slowly soften into perfect layers. The sprinkles add both visual joy and a touch of sweet nostalgia — the kind that turns an ordinary dessert into something special.
Plus, because it’s chilled, this cake is ideal for warm-weather gatherings, potlucks, or last-minute celebrations. You’ll love how effortless it feels to make something that looks this impressive.
Nutrition Snapshot (Per Serving – Approximate)
| Nutrient | Amount |
|---|---|
| Calories | 310 |
| Fat | 15g |
| Carbohydrates | 39g |
| Protein | 3g |
| Sugar | 26g |
(Values may vary depending on brands and ingredient substitutions.)

Your Turn: Make It, Chill It, Love It
You don’t need to spend hours in the kitchen to make something beautiful. With this Easy No-Bake Funfetti Oreo Icebox Cake Recipe, you’re just a few layers away from a dessert that brings smiles, color, and joy to any table.
It’s fun, forgiving, and full of flavor — perfect for when you want a quick win that looks like you spent all afternoon on it. Whether you’re celebrating a birthday, surprising your family, or simply craving something sweet, this no-bake wonder never disappoints.
So grab those Oreos, whip up some cream, and let your fridge handle the rest. Once you try it, you’ll understand why this Funfetti icebox cake is a keeper — one that’ll find its way into your kitchen again and again.
Craving More Easy Desserts?
If you loved this recipe, you might also enjoy:
- No-Bake Peanut Butter Pie
- Cookies and Cream Icebox Delight
- Strawberry Cheesecake Trifle
- Chocolate Coconut Sweet Balls
Final Call-to-Action
✨ Ready to brighten your dessert table?
Make this Easy No-Bake Funfetti Oreo Icebox Cake Recipe today and share your creation online using the hashtag #Topyumrecipes. You’ll inspire others to skip the oven and embrace the joy of effortless sweetness — one colorful slice at a time.

Easy No-Bake Funfetti Oreo Icebox Cake Recipe
Course: Irresistible DessertsCuisine: AmericanDifficulty: Easy12
servings24
minutesIngredients
- Base
1 package (405 g) Oreo cookies
- Cream Layer
240 ml heavy cream
120 g powdered sugar
225 g cream cheese, softened
1 teaspoon vanilla extract
- Mix-ins
60 g rainbow sprinkles
90 g mini chocolate chips (optional)
Directions
- Step 1: Crush the Oreos
Take your Golden Oreos and break them into medium-sized chunks. You don’t want a fine crumb — the little bits give your cake a nice crunch. If you prefer a softer texture, dip each cookie in milk before layering. - Step 2: Prepare the Creamy Filling
In a large mixing bowl, combine softened cream cheese, vanilla pudding mix, milk, and vanilla extract. Beat until the mixture becomes smooth and creamy. You’ll notice it thickens slightly as it rests. - Step 3: Fold in the Whipped Topping
Gently fold the whipped topping into the pudding mixture. Avoid overmixing — the goal is to keep it light and airy. Sprinkle in those colorful Funfetti sprinkles and fold a few more times to evenly distribute them. - Step 4: Layer Your Cake
Grab an 8×8-inch or 9×9-inch dish. Begin with a layer of Oreos on the bottom, followed by a thick layer of your creamy Funfetti filling. Repeat the process until you reach the top, finishing with cream. - Step 5: Chill to Perfection
Cover the dish and refrigerate for at least 4 hours — or overnight for best results. During this time, the Oreos soften, creating that luscious icebox cake texture you’ll love. - Step 6: Decorate and Serve
Before serving, top with extra whipped cream, crushed Oreos, and a sprinkle of rainbow happiness. Slice it up and get ready for smiles all around.
Recipe Video
Notes
- Pro Tips for the Perfect Funfetti Oreo Icebox Cake
Use a clear dish: The colorful layers look stunning through glass.
Let it chill overnight: The longer it sits, the more the flavors blend.
Customize the colors: Try themed sprinkles for holidays — red and green for Christmas, pink and white for Valentine’s Day, etc.
Add texture: Mix in mini marshmallows, crushed candy bars, or white chocolate chips for fun twists.