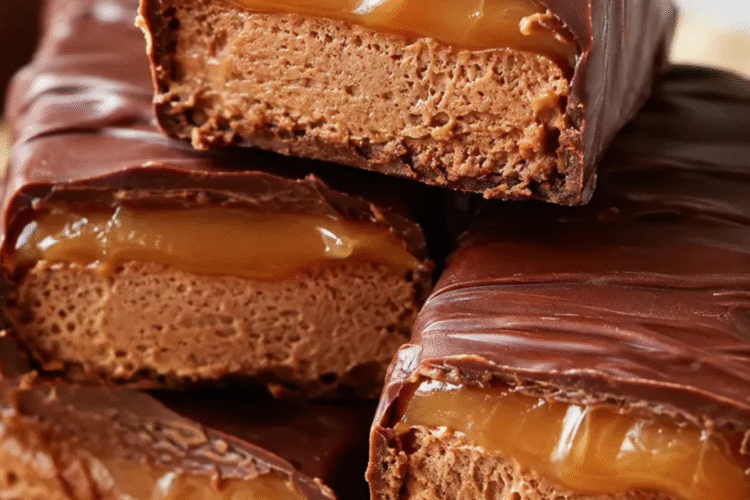
There is something special about biting into a chocolate candy bar and finding a soft, fluffy center underneath that rich chocolate shell. Add a layer of chewy caramel, and suddenly you have the kind of dessert that takes you straight back to childhood.
That is exactly what makes Homemade Milky Way Bars such a fun treat to make in your own kitchen. You get layers of creamy nougat-style filling, buttery caramel, and smooth chocolate in every bite. Instead of reaching for a packaged candy bar when your sweet tooth appears, you can make a generous batch yourself and keep it ready for whenever the craving hits.
You also get plenty of room to make the recipe your own. You can cut the bars large or small, use milk chocolate or dark chocolate, add a tiny pinch of flaky salt, or make miniature pieces for a holiday dessert tray.
Best of all, you do not need complicated candy-making equipment. With a pan, a few bowls, a saucepan, and some patience while the layers chill, you can make delicious homemade chocolate caramel bars right at home.
What Are Homemade Milky Way Bars?
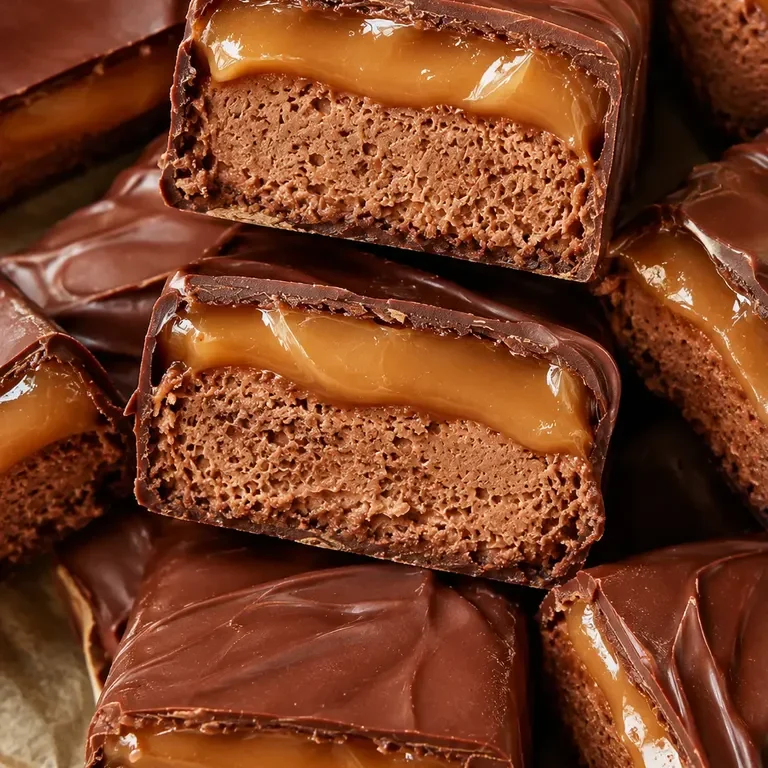
Homemade Milky Way Bars are a homemade candy inspired by the familiar combination of soft nougat, caramel, and chocolate associated with Milky Way-style candy bars.
This homemade version is not intended to duplicate a commercially manufactured candy bar exactly. Instead, it captures the flavors and textures many people love: fluffy candy filling, rich caramel, and a generous chocolate coating.
The three main components work together beautifully:
- Nougat-style center: Soft, creamy, and lightly vanilla flavored.
- Caramel layer: Rich, buttery, and chewy.
- Chocolate coating: Smooth, sweet, and slightly snappy once set.
The contrast between the layers is what makes these bars so satisfying. The center is soft, the caramel gives you that pleasant chew, and the chocolate adds a rich finish.
What Makes These Homemade Candy Bars So Good?
Making candy at home gives you more control over the finished dessert. You decide how thick each layer should be, how large each piece should be, and what type of chocolate you want on the outside.
These bars are especially useful when you are looking for an easy homemade candy recipe for:
- Christmas treat boxes
- Birthday parties
- Bake sales
- Dessert trays
- Family gatherings
- Homemade food gifts
- Weekend baking projects
Once your ingredients are prepared, most of the work comes down to layering, chilling, cutting, and dipping.
Why You’ll Love This Homemade Milky Way Bars Recipe
There is a reason chocolate-and-caramel desserts disappear quickly at parties. You get several textures and flavors in one bite, and these candy bars are no exception.
Here are a few reasons you may want to save this recipe:
- Rich and chocolatey: Every bar is covered in a smooth chocolate coating.
- Soft and chewy: The caramel adds a satisfying texture without making the candy difficult to eat.
- Simple ingredients: You can find most of the ingredients in a regular grocery store.
- Make-ahead friendly: The bars can be prepared ahead of serving time.
- Easy to customize: Change the chocolate, size, or toppings to suit the occasion.
- Great for gifting: Wrap individual pieces in candy wrappers or place them in a decorative box.
If you have ever searched for an easy Homemade Milky Way recipe, this layered approach is a convenient place to start.
Ingredients for Homemade Milky Way Bars
Before you begin, gather everything you need. Having your ingredients measured ahead of time will make the process much smoother, especially when you are working with melted caramel and chocolate.
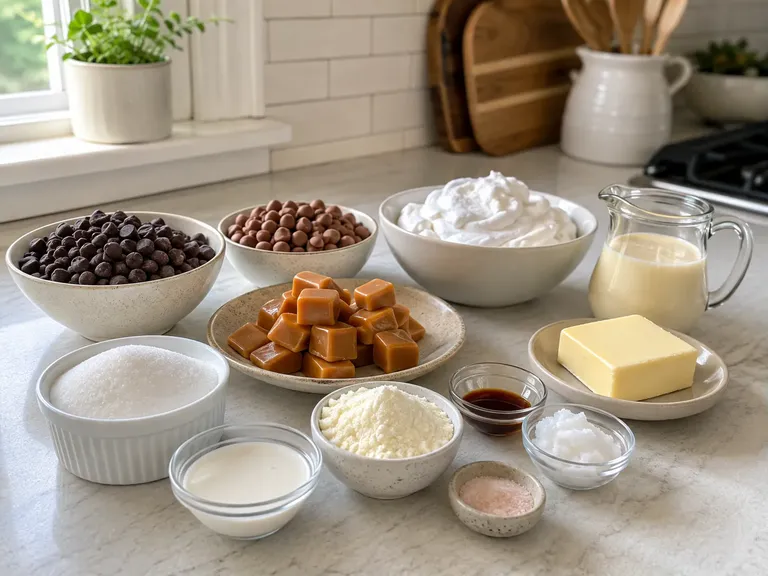
Ingredients for the Nougat-Style Layer
| Ingredient | Amount | Purpose |
|---|---|---|
| Marshmallow creme | 7 oz | Creates a soft, fluffy center |
| Unsalted butter, softened | 4 tbsp | Adds richness |
| Powdered sugar | 1 cup | Gives the center structure |
| Vanilla extract | 1 tsp | Adds warm vanilla flavor |
| Salt | 1/8 tsp | Balances the sweetness |
Ingredients for the Caramel Layer
| Ingredient | Amount | Purpose |
|---|---|---|
| Soft caramel candies, unwrapped | 11 oz | Creates the chewy caramel layer |
| Heavy cream | 2 tbsp | Helps make the caramel smooth |
| Unsalted butter | 1 tbsp | Adds richness and a silky texture |
Ingredients for the Chocolate Coating
| Ingredient | Amount | Purpose |
|---|---|---|
| Milk chocolate melting wafers or chocolate chips | 16 oz | Creates the chocolate shell |
| Coconut oil | 1 tbsp | Helps make the coating smooth and fluid |
You can use dark chocolate instead of milk chocolate when you prefer a deeper, less-sweet flavor.
Kitchen Tools You’ll Need
You do not need a professional candy-making setup for these homemade chocolate caramel bars.
Essential Equipment
- 8-by-8-inch or 9-by-9-inch baking pan
- Parchment paper
- Medium mixing bowl
- Microwave-safe bowl
- Small saucepan
- Rubber spatula
- Measuring cups and spoons
- Sharp knife
- Fork or dipping tools
A candy thermometer is optional for this particular shortcut-style caramel method, since you are melting prepared caramel candies rather than making caramel entirely from sugar.
How to Make Homemade Milky Way Bars
The secret to getting beautiful layers is simple: allow each layer enough time to become firm before adding the next one.
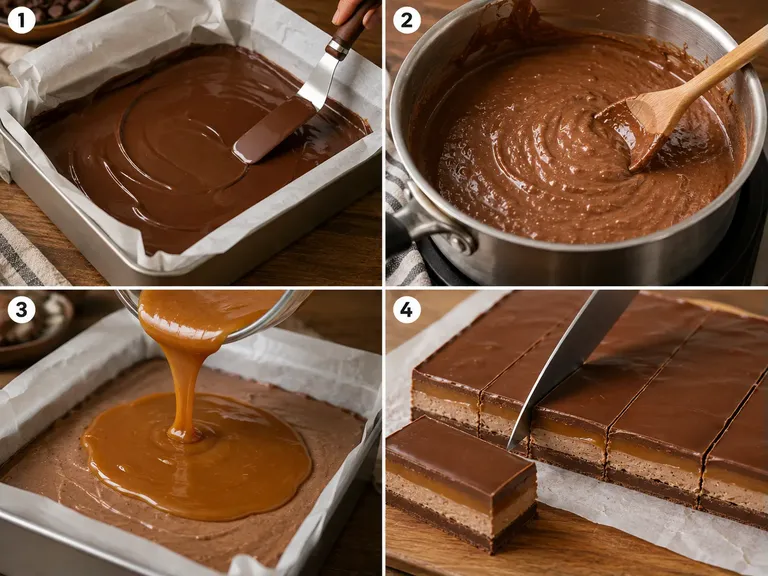
Step 1: Prepare Your Pan
Line an 8-by-8-inch baking pan with parchment paper, leaving some paper hanging over the edges.
These extra edges act like handles later, allowing you to lift the entire candy slab from the pan without fighting with the corners.
Lightly grease the parchment if needed.
Set the pan aside while you prepare the filling.
Step 2: Make the Nougat-Style Layer
Place the softened butter in a mixing bowl and beat or stir until creamy.
Add the marshmallow creme and vanilla extract. Mix until the ingredients are evenly combined.
Gradually add the powdered sugar and continue mixing until you have a thick, smooth mixture.
Add the salt and stir once more.
The finished mixture should be soft enough to spread but thick enough to hold its shape.
Transfer it to the prepared pan and press it into an even layer.
A lightly greased spatula makes this job much easier.
Try not to make one side dramatically thicker than the other. An even center will give your finished Homemade Milky Way Bars a much cleaner appearance.
Place the pan in the refrigerator for about 20 to 30 minutes, or until the nougat layer feels firm.
Step 3: Prepare the Caramel Layer
Place the unwrapped caramel candies, heavy cream, and butter in a small saucepan.
Warm the mixture over low heat, stirring frequently.
Keep the heat gentle. You want the caramel to melt slowly and become smooth rather than scorch around the edges.
Once everything has melted, remove the saucepan from the heat and stir until completely smooth.
Let the caramel cool for a few minutes. You want it warm and spreadable, but not piping hot when it goes onto the chilled nougat.
Pour the caramel over the nougat layer.
Use a spatula to spread it evenly from edge to edge.
Return the pan to the refrigerator and chill until the caramel has firmed up. This can take approximately 30 to 45 minutes depending on the depth of the layers and the temperature of your refrigerator.
How Do You Know When the Caramel Is Ready?
Your caramel should look smooth and feel firm when gently touched.
It should not be:
- Runny
- Bubbling
- Extremely hot
- Completely hard
The goal is a soft, chewy layer that holds together after the candy is cut.
Step 4: Cut the Candy Bars
Once the caramel has chilled, lift the candy slab from the pan using the parchment paper.
Place it on a cutting board.
Use a sharp knife to cut the candy into bars.
For a classic candy-bar appearance, cut the slab into approximately 12 to 16 pieces.
For parties or dessert trays, make smaller bite-sized pieces instead.
If the candy sticks to your knife, wipe the blade clean between cuts. You can also slightly warm the knife with hot water, dry it thoroughly, and use it to make smoother cuts.
Do not let water come into contact with the chocolate later, so always dry your knife completely before handling the chocolate-coated candy.
Step 5: Melt the Chocolate
Place your chocolate wafers or chocolate chips in a microwave-safe bowl.
Heat in short intervals, stirring thoroughly between each one.
Continue until the chocolate is mostly melted, then stir until the remaining pieces disappear into the residual heat.
Stir in the coconut oil.
The finished chocolate should be smooth and fluid enough for dipping.
Avoid overheating the chocolate. Excessive heat can make it thicker and more difficult to work with.
Step 6: Coat the Homemade Milky Way Bars
Take one chilled candy piece at a time and dip it into the melted chocolate.
Use a fork to lift the bar out, allowing excess chocolate to drip back into the bowl.
Place the coated candy onto parchment paper.
Repeat with the remaining pieces.
For an extra-thick chocolate shell, allow the first coat to set and dip the candy a second time.
Let the chocolate coating harden at room temperature in a cool kitchen or place the bars in the refrigerator for a short period to speed up the process.
Tips for Making the Best Homemade Milky Way Bars
A few small details can make a noticeable difference in the final texture.
Keep Every Layer Even
When the nougat or caramel is spread unevenly, some finished bars will have a thick caramel center while others barely have any.
Take a moment to spread each layer carefully.
An offset spatula or the back of a spoon can help you create smooth, even surfaces.
Chill Between Layers
Do not rush the chilling stages.
The nougat needs to be firm enough to support the warm caramel. The caramel needs to be firm enough to handle being cut and dipped.
Skipping these steps can cause the layers to blend together.
Work With Chilled Candy
Cold candy centers are easier to dip because they are less likely to soften immediately when they come into contact with warm chocolate.
If your kitchen is warm, return the cut pieces to the refrigerator for 10 to 15 minutes before dipping.
Do Not Overheat Your Chocolate
Gentle heating is your friend.
Stirring regularly helps distribute the heat and encourages the chocolate to melt evenly.
Use a Sharp Knife for Cleaner Pieces
A dull knife tends to compress soft caramel rather than slicing through it cleanly.
Keep your blade clean and use steady pressure.
Common Mistakes to Avoid
1. Adding Caramel While It Is Extremely Hot
Very hot caramel can soften the nougat too much.
Allow the caramel to cool slightly after melting before spreading it over the center.
2. Cutting the Candy Too Soon
Warm candy can fall apart when sliced.
Give the layers enough time to firm up.
3. Overheating Chocolate
Chocolate does not need to be extremely hot to melt.
Use short heating periods and stir between them.
4. Making the Nougat Layer Too Thin
A very thin center may disappear beneath the caramel and chocolate.
Spread it evenly and aim for a substantial, soft layer.
5. Skipping Parchment Paper
Trying to remove sticky homemade candy directly from a pan can turn into a frustrating mess.
Parchment creates a simple lifting surface and makes cleanup easier.
Homemade Milky Way Bars Variations
Once you have the basic technique down, you can easily create different versions.
Dark Chocolate Milky Way Bars
Replace milk chocolate with dark chocolate for a richer contrast against the sweet nougat and caramel.
A darker chocolate can be especially enjoyable if you find traditional candy bars overly sweet.
Mini Homemade Milky Way Bars
Cut the slab into small squares rather than traditional bar shapes.
Mini candies are excellent for:
- Holiday cookie trays
- Dessert buffets
- Party favors
- Candy bowls
- Gift boxes
Salted Caramel Chocolate Bars
For a sweet-and-salty variation, add a small amount of flaky sea salt over the caramel before it sets.
Do not go overboard. A little salt can provide a nice contrast without overwhelming the chocolate and caramel.
Peanut Butter Chocolate Caramel Bars
A thin layer of creamy peanut butter can transform the flavor profile.
Spread a small amount over the firm nougat before adding the caramel, or stir a little peanut butter into the chocolate coating.
This version works particularly well if you love peanut butter cups and chocolate caramel candy.
How to Store Homemade Milky Way Bars
Storage is important for keeping your homemade candy fresh and enjoyable. Because this recipe contains ingredients such as butter and heavy cream, you should pay attention to proper refrigeration and food-handling practices.
According to the U.S. Food and Drug Administration (FDA) food safety guidelines, your refrigerator should be kept at 40°F (4°C) or below.
For additional guidance, you can also check the FDA’s article on safe food storage and refrigerator temperatures.
Store your Homemade Milky Way Bars in an airtight container, with parchment or wax paper between layers to prevent the chocolate coating from sticking.
When you’re serving the bars at a party, keep foods that require refrigeration chilled. The FDA recommends refrigerating perishable foods within two hours, or within one hour when the temperature is above 90°F (32°C). You can read more about this recommendation in the FDA’s Safe Food Handling guide.
Can You Freeze Homemade Milky Way Bars?
Yes, you can freeze these candy bars for longer storage.
Wrap individual bars tightly in parchment or wax paper and place them inside an airtight freezer container or freezer-safe bag.
To serve, transfer them to the refrigerator and allow them to thaw gradually.
Avoid placing very cold chocolate-coated candy directly into a warm, humid environment for extended periods because condensation can affect the appearance of the chocolate.
How to Serve Homemade Milky Way Bars
You can serve these candy bars just as they are, but they also make a fun addition to other desserts.
Try serving them:
- With coffee or tea.
- Alongside hot chocolate.
- Chopped over vanilla ice cream.
- On a holiday dessert platter.
- As part of a homemade candy gift box.
- Beside brownies and cookies.
- Cut into tiny pieces for a dessert buffet.
For parties, place the bars in small paper candy cups. It instantly makes them look more polished.
Frequently Asked Questions About Homemade Milky Way Bars
Can you make Homemade Milky Way Bars without a candy thermometer?
Yes. This recipe uses prepared caramel candies rather than making caramel from scratch, so you do not need to monitor a sugar syrup temperature. You mainly need to watch the texture and heat the caramel gently until it is smooth.
How long do Homemade Milky Way Bars last?
The exact storage life depends on the ingredients, preparation, storage temperature, and handling. For the best quality, store them in an airtight container and follow appropriate refrigeration guidance for ingredients that require refrigeration. Keep your refrigerator at or below 40°F (4°C).
Can I freeze Homemade Milky Way Bars?
Yes. Wrap the finished candy individually or separate the layers with parchment before placing them in a freezer-safe container. Thaw them gradually in the refrigerator for the best texture.
Why is my caramel layer too hard?
Caramel can become harder when it is heated too aggressively or when too much moisture cooks away.
For this recipe, use low heat and remove the caramel mixture from the stove once it becomes completely smooth.
Why is my chocolate coating not smooth?
The most common problems are overheating, introducing moisture, or allowing the chocolate to cool too much while dipping.
Melt the chocolate gently and keep your utensils completely dry.
Can I use chocolate chips instead of melting wafers?
Yes. Chocolate chips can work, although their melting characteristics differ from candy coating or melting wafers.
Adding a small amount of coconut oil can help create a smoother, more fluid coating.
Can I make Homemade Milky Way Bars ahead of time?
Absolutely. In fact, making them ahead can make them easier to serve at parties and gatherings.
Once completely set, store the bars in an airtight container until you are ready to serve them.
How do I cut Homemade Milky Way Bars without making a mess?
Start with a properly chilled candy slab and use a sharp knife.
If the caramel begins sticking to the blade, wipe it clean between cuts. A slightly warmed and completely dried knife can also help produce cleaner slices.
Homemade Milky Way Bars Recipe Card
| Recipe Details | Information |
|---|---|
| Prep Time | 20 minutes |
| Cook Time | 10 minutes |
| Chill Time | 1–1½ hours |
| Total Time | About 1½–2 hours |
| Servings | 12–16 bars |
| Category | Dessert / Candy |
| Method | Stovetop, Chilled |
| Flavor | Chocolate, Caramel, Vanilla |
Ingredients
For the nougat-style layer:
- 7 oz marshmallow creme
- 4 tablespoons softened unsalted butter
- 1 cup powdered sugar
- 1 teaspoon vanilla extract
- 1/8 teaspoon salt
For the caramel layer:
- 11 oz soft caramel candies, unwrapped
- 2 tablespoons heavy cream
- 1 tablespoon unsalted butter
For the chocolate coating:
- 16 oz milk chocolate melting wafers or chocolate chips
- 1 tablespoon coconut oil
Instructions
- Line an 8-by-8-inch baking pan with parchment paper, leaving an overhang.
- Mix softened butter, marshmallow creme, vanilla, and salt until smooth.
- Gradually add powdered sugar and mix until a thick nougat-style mixture forms.
- Press the mixture evenly into the prepared pan.
- Refrigerate for 20 to 30 minutes.
- Melt caramel candies, heavy cream, and butter in a saucepan over low heat, stirring until smooth.
- Let the caramel cool slightly, then spread it evenly over the chilled nougat.
- Refrigerate for another 30 to 45 minutes, or until firm.
- Lift the candy slab from the pan and cut it into 12 to 16 bars.
- Melt the chocolate gently and stir in the coconut oil.
- Dip each chilled candy bar into the chocolate.
- Place the coated bars on parchment paper and allow the chocolate to set.
- Store the finished bars in an airtight container.
Why Homemade Candy Is Worth Making
There is something deeply satisfying about making a candy bar yourself.
You start with simple ingredients, layer them together, and end up with something that looks like it came from a candy shop. You can decide how generous you want the caramel to be, how thick you want the chocolate coating, and how big each piece should become.
You also get the pleasure of sharing something homemade.
Maybe you make these Homemade Milky Way Bars for a family movie night. Maybe you put a few in a little box for a friend. Maybe you prepare a batch before the holidays and watch them disappear from the dessert table one by one.
Those small moments are often what make homemade desserts memorable.
Conclusion
These Homemade Milky Way Bars bring together everything you want in an indulgent candy treat: a soft nougat-style center, chewy caramel, and a smooth chocolate shell.
The process is straightforward, and you can prepare the layers ahead of time, making this recipe practical for parties, holidays, gifting, or simply satisfying a serious chocolate craving.
Once you have made your first batch, experiment with dark chocolate, mini pieces, salted caramel, or even peanut butter. The basic recipe gives you plenty of ways to create a version that suits your taste.
So gather your ingredients, line your pan, and give yourself an afternoon to make something delicious from scratch. When you finally bite into that first chocolate-covered piece and reach the soft caramel center, you will understand exactly why homemade candy is worth the little bit of extra effort.
Save this recipe, share it with someone who loves chocolate and caramel, and let everyone know how your Homemade Milky Way Bars turned out!